
The
Bark Canoe Store
2317 West Fairview Avenue
Spokane, WA 99205
(509)327-7902
(509)327-7989
barkcanoe@earthlink.net
www.barkcanoe.com
John Lindman
proprietor/builder
copyright (c) 2005
All Rights Reserved
IN THIS ISSUE
1. News - Recently Built Canoes at The Bark Canoe Store
2. Building Tip -
More on Miniatures by Ted Behne
News - Recently Built Canoes at The Bark Canoe Store
I don't know about you but I'm a sucker for pictures.
So here are some photos of
Recently Built
Canoes at The Bark Canoe Store.
You may have noticed that I missed getting a newsletter out during April and
pretty much missed May. I have been slammed. It's been 12 hour days 7 days
a week for some time but I'm not complaining. Just making excuses for not
getting the letter out on schedule. Shown here are some of the canoes I've
recently completed. In the upcoming newsletters I will show you a 26' fur
trade model just completed and the new line of fiberglass replicas. Yes more
pictures.
Oh, and if you like pictures you may be familiar with the art of Philip R. Goodwin.
He did several paintings of turn of the last century woodsmen in birchbark canoes.
One painter many are not so familiar with is Frank Schoonover. He spent time in
1911 with the Ojibwe near Long Lake, Ontario and did some terrifc paintings.
I recently bought two books of his work at Amazon.com. I highly recommend them.
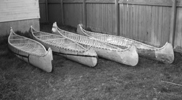
Enough said, now for the boats.
Moving from left to right, the first canoe was for a private individual in Michigan.
It is a 14' Ojibwe Oldstyle hunting canoe. This would be typical for his area.
The owner will be using it on the water, not displaying it.
The next one is an Ojibwe Longnose. It is 15' 3" and about 13" deep. It was featured
in the May 2005 Canoe & Kayak Magazine in a write-up on touring canoes.
The last two are 16' Ojibwe Oldstyle models. About 12" deep and 36" wide. These
are for a Canadian film. They will be paddled from Thunder Bay to Winnepeg this
summer.
Building Tip - More on Miniatures by Ted Behne
Making Ribs
This article will outline the process for laying out and making ribs. Previous articles
outlined the process for selecting a canoe to model, reducing its dimensions to one-quarter
scale, making a "blueprint" of the canoe, constructing a reusable building platform, making
a gunwale frame, making and installing thwarts and splitting cedar.
To review previous articles, go to
The Bark Canoe Store - "Tips"
and sort through past issues of "The Bark Canoe Aficionado."
Future articles will focus on assembling the components of the canoe: the gunwales, gunwale
frame, thwarts, ribs, sheathing, etc. Preparing these skeletal elements constitutes at least
50 percent of the work of building any canoe. The assembly process takes the other 50 percent
of the building time. Each component of the canoe can be made separately, at any time and in
any sequence, then stored until you are ready for assembly. It should also be noted that
all of the procedures outlined in these articles are identical to those for making full size
canoes. Required tools for making ribs: X-acto razor knife, metal straight edge, low-angle
block plane.
Begin by studying the "blueprint" to calculate the number, placement and spacing of the ribs.
Rib widths, shapes and spacing vary greatly in various tribal styles. Some are very narrow
and widely spaced, like the Northern Cree, while others literally seem to "panel" the interior
of the canoe, like the Maliseet. To simplify the rib layout process make a layout stick(s)
marked with the lashing and rib locations between each thwart. Ribs should be located on both
sides of thwarts but not under them. Notch the underside of the layout stick(s) to fit between
thwarts, but allow the topside to extend over the thwarts. Transfer the lashing and rib
location markings on the stick(s) to the gunwales with a pencil. Mark the lashing locations
with an "X" to distinguish them from the rib locations. The "X" will be concealed under the
lashings in the finished canoe.
Ribs should be made in three lengths, the shortest to be fitted from the stems to the end
thwarts, the next longest from the end thwarts to the quarter thwarts, and the longest from
the quarter thwarts to the center thwart. Determine the appropriate lengths by laying a
flexible measuring tape on the blueprint cross-section and measuring the lengths needed in
each case. Count the number of ribs needed in each length, add a few extra for breakage when
bending, then add up the total to be sure you have enough to do the job.
Rib widths vary considerably among tribal styles. Typical full-size width for a Maliseet
canoe rib, for example, is 2 ˝ to 3", which becomes 5/8" to ľ" at one-quarter scale. Rib
thickness is 3/8" for a full-size canoe in virtually all styles. The 1/4-scale size is 3/32".
That may seem tiny and impossible to replicate accurately, but after you make a few you may be
surprised at how easy it is "eyeball" the correct thickness and to efficiently repeat it. Most
rib styles are tapered, with the taper confined to 25 percent of the rib at each end. Make a
perfect pattern rib for each of the three lengths and use it as a template to make others.
Use a razor knife to cut out the rib blanks. Use a low-angle block plane to form the tapers
and to round the top edges of each rib.
Bundle the finished ribs by size and set aside to wait for bending. Next, turn your attention
to preparing roots for lashing the canoe together. That process will be described in next
month's newsletter.
If you have questions about any of the above, just send an email to
tedbehne@comcast.net.
You can view Ted's work here.
To remove yourself from this list, simply reply to this email with the word "REMOVE" in the subject.
------------------------------------------------------------------------------------------